|
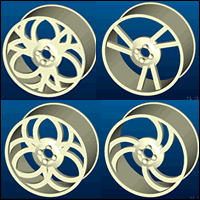
Figure 1: Design
Variations with Pro/PROGRAM
|
This
article highlights the basic concepts of using Pro/PROGRAM
to manipulate & automate a model. Assembly techniques are
not represented here, although the concept is similar.
Overview
Pro/PROGRAM
allows you to vary your design by incorporating user prompts
into the regeneration cycle. Use Pro/PROGRAM to manually delete,
reorder, and suppress features, modify dimensions, and pause
the regeneration process to add additional features. Figure
1 shows the various possibilities of the wheel design with
the use of Pro/PROGRAM. By having all these features in the
model at one time and using Pro/PROGRAM to supress certain
features, Pro/E can prompt you which features you would like
to include in the regenerated model.
Pro/PROGRAM
vs. Family Tables
- Family
tables are effective when you know the variations of the
design or are sure they are not going to change, as in the
case with part libraries (standard parts).
- Pro/PROGRAM
is useful when you do not know the variations of the design
in advance. You can create prompts for different values
and parameters to display upon regeneration and build appropriate
variations on the fly. After generating the variations
of your design, you can save them to a family table.
Structure
The
Pro/PROGRAM structure is divided into 5 main sections: Header,
Input, Relations, Model Section, & Mass Props. Refer to Table
1 below.
- Header
- First three lines of the program containing model name
and program revision information.
- Input
- Where user prompts and parameters are stored. This section
is initially empty.
- Relations
- This section contains all part or assembly relations.
- Model
Section - Section in which you actually build the model.
Contains series of paragraphs that contain information about
each feature or component. You can build variations of your
design by manipulating this section.
- Mass
Props- Use this section to automatically update the mass
properties of the model when they change. Initially empty.

Table
1: Bare Pro/PROGRAM Code
Automating
the Design Process
Table
2 below shows an example of a Pro/Program implementation.
Upon regeneration, the user is prompted to enter the height
& width of the part, the material, and whether or not to include
a slot. The following steps indicate how this was done.
- Create
generic model for basis of the design. Include features
for necessary design variation.
- Add
input statements - Create prompts to give model appropriate
information. >> Parameter_Name Parameter_Type�prompt that
is displayed in the message window
- Write
relations - Convey information from input statements to
the model parameters. (Can also be added with Edit Rel option
from the RELATIONS menu.)
- Edit
model section - Add logic statements, generally IF - THEN
statements, based on the input statements and relations.
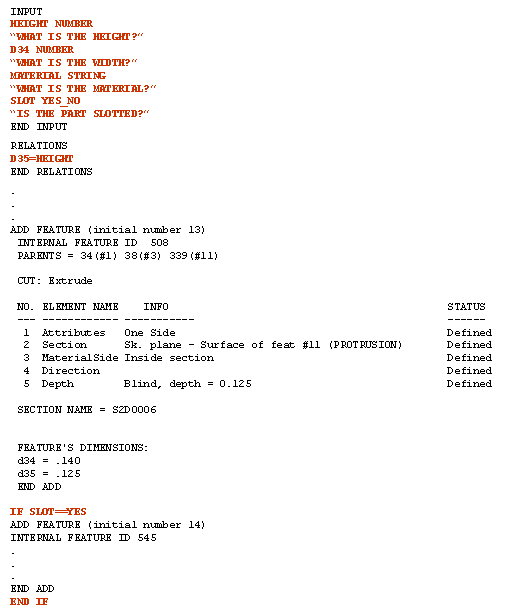
Table
2: Pro/Program Example with Inputs, Relations, & If-Then Statements
Incorporating
Changes
- After
exiting from the editor, the system checks your program
for correct syntax. If it finds an error, you are required
to correct it.
- It
asks you if you want to incorporate the changes into the
design.
- Yes
- Overwrites old program with new, edited version and
executes the program.
- No
- Uses old program for the model, but saves the edited
version on the hard drive for future use. Saves file
as part_name.pls. The next time you edit the program,
it asks you to specify which program to edit -- the
current model or the saved version on the hard drive.
Running
the Program
To
run the program, simply regenerate the part. You will be prompted
with the following choices upon regeneration:
- Enter
- Specify new values for any or all of the prompts.
- Current
Vals - Retain current values for the parameters.
- Read
File - You can make a file containing all of the values
for the prompts and then read it into Pro/ENGINEER.
Tip
for Family Tables
Once
you have run a program, you can permanently save that version
of the model by using the Instantiate option in the PROGRAM
menu. The system adds an instance to the family table for
that version.
Manipulating
Features with Pro/PROGRAM
- Delete
a feature or component - Delete all lines between and including
the ADD and END ADD for that feature or component.
- Reorder
a feature or component - Cut all lines between and including
the ADD and END ADD for that feature or component and paste
it at another location in the program file.
- Suppress
a feature or component - Add the word SUPRESSED after
the word ADD for that feature or component.
- Resume
a feature or component - Delete the word SUPRESSED after
the word ADD for that feature or component.
- Modify
a dimension - Add the word MODIFY before a dimension in
the model section of the program, then enter a new value
for that dimension.
- Pause
the regeneration - Add an INTERACT statement anywhere
in the model section. When Pro/E regenerates the model,
it pauses at this statement and asks if you want to add
another feature to the model. Each time you add a new feature,
it pauses again, allowing you to add more features. It executes
the remainder of the program when you respond with a no.
The INTERACT statement is then removed from the program
and is replaced with the new features that you added.
|
